Quick Answer
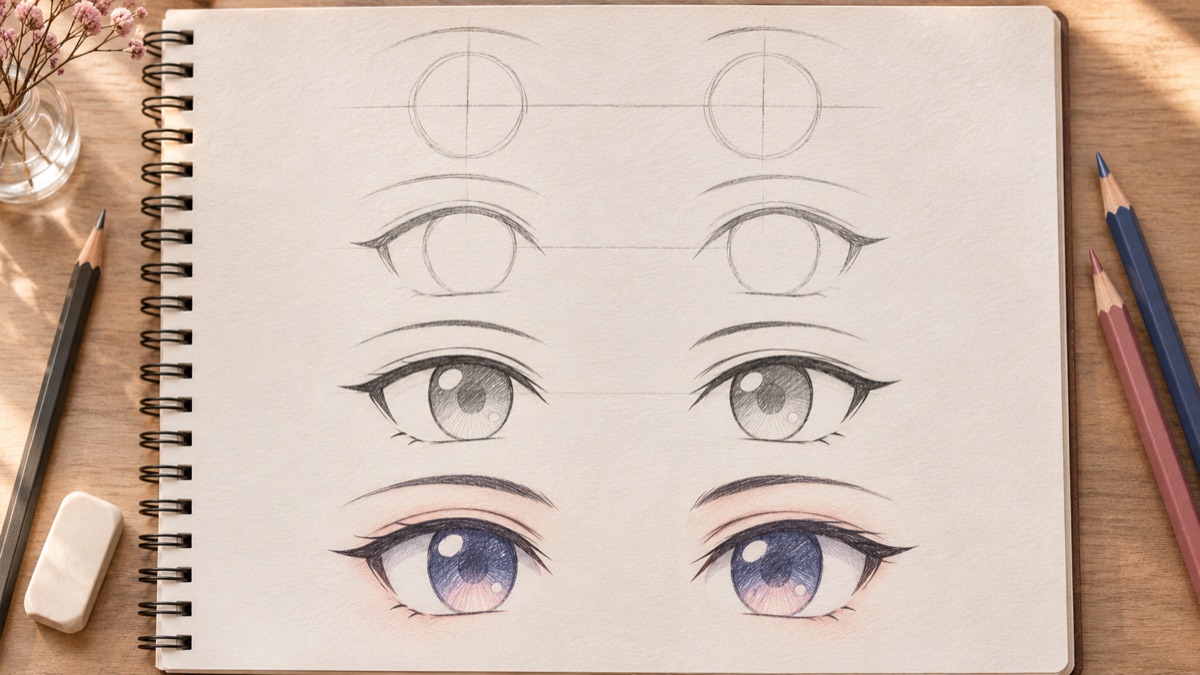
To draw anime eyes, start with a light horizontal guide and two simple eye shapes. Place the irises so the upper eyelids cover part of each circle, add pupils and highlights, thicken the upper lash lines, and use the eyebrows to establish the expression. Check the pair at a small size before shading. The most convincing result comes from clear shapes and consistent gaze direction—not from adding the most detail.
Anime and manga eyes are stylized, so there is no single correct template. Large irises can feel open or youthful; narrow lids can feel calm, tired, or determined; simplified closed eyes can communicate joy instantly. Learn one neutral construction first, then change a few variables deliberately. The How to Draw app can provide guided references, while this tutorial shows how to turn those references into repeatable paper practice.
Open How to Draw for step-by-step subjects, then redraw the same eye pair freehand in your sketchbook.
What You Need
A regular HB or No. 2 pencil, a soft eraser, and smooth drawing paper are enough. A darker 2B pencil or fineliner can strengthen the final upper lid after the construction works. Colored pencils are optional. If you work digitally, choose one pressure-sensitive pencil brush and resist switching tools during the first study.
Keep the first practice small—about 2 to 3 inches wide for the pair. A modest size makes it easier to compare spacing and prevents you from polishing one iris while the two eyes still point in different directions. Place a clean reference beside the page rather than under your drawing hand.
Understand the Shapes Before You Stylize
Even highly stylized eyes borrow a few readable parts from real anatomy: an opening formed by the lids, an iris surrounding the pupil, a visible white area, and a brow above. Cleveland Clinic identifies the iris as the colored part that surrounds the pupil and the sclera as the white structure that helps form the eyeball. For drawing, that means the iris should feel seated within a rounded eye, not pasted onto a flat almond.
Anime design then simplifies or exaggerates those parts. Japan House describes strong lines and large eyes as familiar manga/anime conventions used alongside other visual cues to communicate emotion. Treat that as a design language, not a rigid formula. You can make the iris larger, omit a lower-lid segment, or turn the upper lid into a bold graphic stroke, provided the pair still shares a consistent gaze and expression.
How to Draw Anime Eyes Step by Step
- Draw a horizontal eye line. Use one faint line for both eyes. Add a short vertical center mark for the face so you can compare the left and right spacing.
- Block in two upper lids. Draw shallow arches or slightly angular curves. Keep them light. The inner ends usually sit closer to the center line; the outer ends may taper upward or downward depending on the expression.
- Add the lower lids. Use lighter, shorter curves than the upper lids. Leaving small gaps at the corners often gives the drawing a cleaner stylized look. Check that the two openings have compatible height and tilt.
- Place the irises. Lightly draw circles or tall ovals. Let the upper lid overlap them; a fully visible floating circle can make the gaze look startled unless surprise is intentional. Use the same imaginary vertical line through each iris to keep both eyes aimed together.
- Add pupils and highlights. Center each pupil within its iris, then place matching highlights on the same side. Highlights suggest one shared light source. Avoid using them to hide an iris that is off-center.
- Strengthen the upper lash line. Darken the upper lid from the middle toward the outside, then taper the stroke. Add only a few lashes that follow the lid direction. A solid black fringe is optional, not required.
- Draw the eyebrows. Place them after the eyes so they support the intended emotion. Keep a visible gap between brow and lid. Even a small change in brow angle can transform the expression.
- Shade from large to small. Establish one broad shadow under the upper lid, a midtone through the iris, and a lighter lower area. Add texture or a color gradient only after the values read clearly.
- Clean and compare. Soften construction lines, zoom out or hold the page at arm’s length, and compare iris size, eye height, corner positions, and gaze. Preserve some pencil texture instead of erasing every trace of process.
Change the Expression With Four Controls
Expression becomes easier when you change a few controls instead of redrawing everything at random. First, adjust the lid opening: wide openings suggest alertness or surprise, while compressed openings can suggest calm, skepticism, or fatigue. Second, change the upper-lid angle. A rising outer corner often feels energetic; a falling outer corner can feel gentle or worried.
Third, vary how much of the iris is visible. When the upper and lower lids reveal more white around the iris, the character appears more startled. When the lids overlap more of the iris, the gaze appears more relaxed or intense. Fourth, coordinate the brows. Raised curved brows support surprise; inward-sloping brows support determination; soft level brows make a neutral eye feel calm.
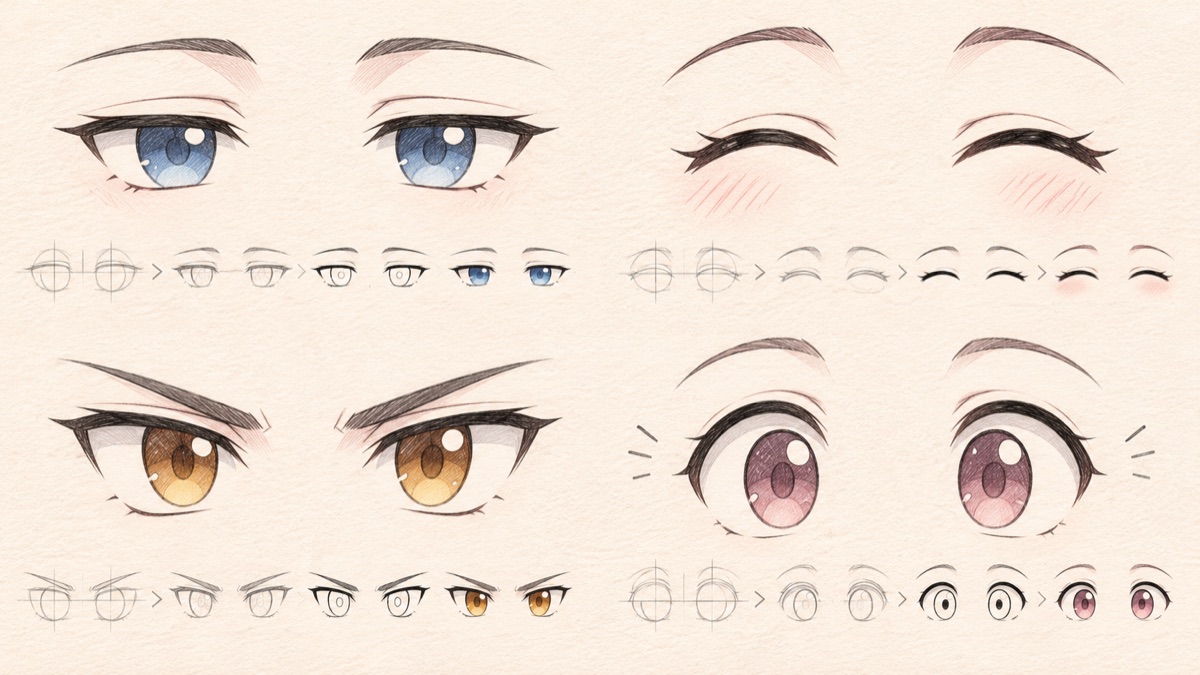
Closed happy eyes can be especially simple: use two confident upward or downward curves, then let the brows and cheek marks support the mood. The goal is readable emotion, not maximum anatomical detail. The anime drawing practice hub offers more subject ideas for building these eyes into original characters.
Shade the Iris Without Making It Muddy
Begin with three values: the dark pupil and upper shadow, a middle iris tone, and a light area near the lower iris. Keep the highlight paper-white or erase it cleanly. Work around the iris in strokes that follow its round form rather than scribbling across it. If you use color, choose one main hue and a darker version of the same hue before introducing a second color.
The upper lid usually casts the darkest shadow across the top of the iris. That shadow connects the iris visually to the lid and helps it feel recessed. A narrow dark ring can define the iris, but make it thinner near the brightest area. Finally, soften the sclera with a very light gray or cool shadow; leaving every white area equally bright can flatten the drawing.
Make Both Eyes Belong to the Same Face
Beginners often draw one attractive eye and then try to copy it perfectly. A better method is to advance both eyes together: upper lids first, then lower lids, then both irises, both pupils, and both brows. This makes comparison part of every stage. The eyes do not need to be mirror images, but they should share the same head angle, lighting, and emotional intent.
Use simple measurements. Compare the distance between the inner corners with the width of one eye. Check whether the outer corners sit on the same tilt. Draw faint vertical lines through the pupils to see whether the gaze agrees. Flip the canvas digitally or view the paper in a mirror to reveal spacing errors your eyes have adapted to.
Common Beginner Mistakes and Quick Fixes
The irises point in different directions
Mark both pupils before adding highlights. Imagine a target outside the page and aim both pupils toward it. Matching highlight placement cannot repair mismatched gaze, so solve the centers first.
The eyes look flat
Let the upper lid overlap the iris, add a small upper shadow, and curve the lower lid around the implied eyeball. Think of the lid as wrapping around a sphere rather than outlining a flat sticker.
One eye keeps growing
Stop detailing. Draw a loose box around each eye and compare box height and width. Reduce the larger opening with the lid shape instead of shrinking only the iris.
The drawing feels copied instead of designed
After one study, close the reference and redraw the construction from memory. Change one feature—lid angle, iris size, brow shape, or color—and keep the rest consistent. This small variation turns copying into a design decision. The trace–copy–recall practice loop explains how to reduce guidance deliberately.
A Focused 15-Minute Practice Plan
- Minutes 1–3: fill a row with upper-lid curves, lower-lid curves, circles, and tapered strokes. The National Gallery of Art recommends experimenting with line qualities and pressure as part of drawing practice.
- Minutes 4–8: construct one neutral pair using all nine steps. Keep the guides visible until both eyes agree.
- Minutes 9–11: redraw the pair from memory at a smaller size. Do not look back until the construction is complete.
- Minutes 12–14: make one expression variation by changing the lids and brows, not by adding accessories.
- Minute 15: circle one improvement and write one target for next time, such as “match pupil height” or “use fewer lashes.”
Repeat the routine for four sessions before changing styles. On the fifth session, use a different reference and notice which construction decisions transfer. The step-by-step beginner practice guide offers a broader routine for moving from guided work to independent drawing.
Draw the Structure, Then Make It Yours
Strong anime eyes are built from a readable lid shape, purposeful iris placement, shared gaze, and an expression that works before the shading begins. Start with light guides, move both eyes forward together, and reserve the darkest marks for the upper lids, pupils, and selected accents.
Most importantly, follow every guided study with a smaller freehand redraw. It does not need to be cleaner. Its job is to show what you understood without the reference. Keep that second attempt, date the page, and repeat the same expression a week later.
Choose a reference in How to Draw, practice the construction, then change the expression and redraw it freehand.
Related Drawing Guides
- How to Draw: Guided Lessons and Drawing Tools
- Anime Drawing Practice Hub
- Step-by-Step Drawing Practice Guide
- How to Draw Anime: Easy Guide for Beginners
- How to Draw Eyes Step by Step for Beginners
- Beginner Drawing Practice Plan That Works
- Best Drawing App for iPad: Lessons and Paper Practice
References
- Cleveland Clinic: Eyes—How They Work, Anatomy, and Common Conditions
- Japan House São Paulo: WAVE—New Currents in Japanese Graphic Arts
- Japan’s Ministry of Economy, Trade and Industry: 10 Reasons Japanese Manga Is Unique
- National Gallery of Art: Drawing Everyday Objects
- National Gallery of Art: Mindful Drawing Activities That Embrace Experimentation