Quick Answer
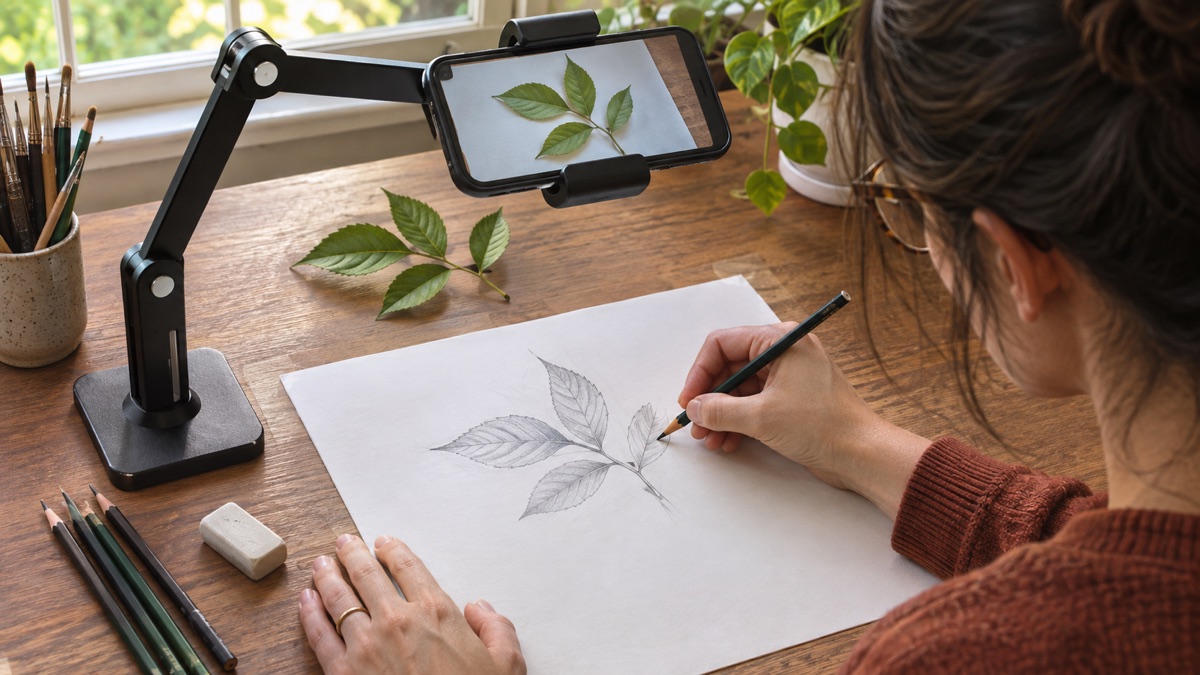
A camera lucida app uses your phone camera and a transparent on-screen reference to help you line up a subject with the paper below. Mount the phone securely, center the camera over the page, resize the reference, lower its opacity, and mark only the silhouette and a few anchor points. Then hide the overlay and finish the drawing by observation.
The modern workflow borrows the central idea of the historical camera lucida: letting an artist compare a subject and drawing surface in one view. A phone does this digitally rather than with a prism. It is useful for proportion, placement, lettering, botanical studies, portraits, and other subjects where a small alignment error can affect the whole sketch. It works best as a temporary scaffold, not as a substitute for looking.
How to Draw offers phone-guided references, AR drawing tools, and step-by-step lessons for iPhone and iPad.
What Is a Camera Lucida?
A traditional camera lucida is an optical drawing instrument. A prism or mirror arrangement helps the artist see the subject and the drawing surface together, so the apparent image can guide hand placement. It does not print, photograph, or physically project a picture onto the paper. The artist still makes every mark.
The Smithsonian records that English scientist William Hyde Wollaston applied for a British patent for his instrument in 1806 and called it a camera lucida in 1807. The patent described a tool for drawing in perspective and copying, reducing, or enlarging drawings. Museum collections also show that later versions varied in size and optical design, from portable artist tools to instruments attached to microscopes.
The Latin name means “light room,” a contrast with the camera obscura, or “dark room.” Getty Research Institute materials describe both among a longer history of optical devices used to help people frame, inspect, and outline the visible world. The important point is not that an optical aid makes a drawing automatically. It gives the artist a shared view in which comparison becomes faster.
How a Camera Lucida App Works on a Phone
A phone cannot recreate the exact optical path of a prism camera lucida, but it can recreate the working experience. The rear camera shows the paper while the app places a selected image over that live view. You can usually move, scale, rotate, and fade the reference until the important contours sit where you want them.
Your eyes alternate between three things: the on-screen reference, the live view of the page, and the real pencil under your hand. That creates a feedback loop. If the phone and paper remain fixed, a point on the reference should continue to match the same point on the page. If either moves, the alignment changes and the drawing can drift.
This is related to an AR drawing app workflow, but you do not need to understand augmented-reality terminology to use it. Think of the overlay as tracing paper that exists on the screen. The reference gives you a temporary map; your pencil turns the map into a physical drawing.
What You Need for a Stable Setup
- A phone or tablet: charge it before you begin and clean the rear camera lens.
- A rigid overhead stand: use a clamp or weighted base that cannot tip when you touch the screen.
- A flat drawing surface: work at a table with enough room for your wrist and forearm.
- Plain paper: tape two corners with removable artist tape if the sheet slides.
- A light pencil: HB or 2H graphite makes construction lines easier to revise.
- Even lighting: light the page from the side so the phone and your hand do not create a hard shadow.
- A clear reference: begin with one object, a strong silhouette, and limited background detail.
Do not balance the phone on books, cups, or other improvised towers. A stable mount protects the device and keeps the overlay in place. Position charging cables away from the drawing hand. For a shorter checklist, use the AR drawing phone setup guide.
Camera Lucida App Setup: 8 Steps
- Choose and crop the reference. Remove distracting background areas. A leaf, shoe, mug, simple animal, or face in three-quarter view is easier than a crowded scene.
- Place and secure the paper. Center the page under the stand. Mark its corner positions lightly or tape two corners so you can tell immediately if it moves.
- Mount the phone parallel to the page. Aim the rear camera at the center of the drawing area. Keep the phone level rather than tilted toward one edge.
- Open the overlay tool. In How to Draw, select an AR or projector-style drawing mode, choose the reference, and allow camera access if the device requests it.
- Frame the full drawing area. Adjust the stand before using digital zoom. Leave enough space around the subject for your hand, labels, or a background.
- Resize, rotate, and fade the image. Fit the subject inside the paper margins. Lower the opacity until both the guide and your graphite remain easy to see.
- Calibrate four anchor points. Mark the subject’s top, bottom, left, and right limits. Pause and confirm that the overlay still meets all four marks before continuing.
- Trace the scaffold, then hide the guide. Add the silhouette, centerline, and a few major landmarks with light pressure. Turn off the overlay before texture, shading, and final line weight.
Alignment, Parallax, and Why Drawings Drift
Parallax is the apparent shift that occurs when you view the same alignment from a different position. In a phone setup, a similar problem appears when the camera is angled, the page is off-center, or your viewpoint changes while comparing screen and paper. One side of the subject may look larger even though you are carefully following the overlay.
Start by making the phone and paper as parallel as possible. Check the page corners in the live view: opposite edges should not converge dramatically. On iPhone, Apple’s Camera settings can display a grid and level, which can help you square the device before opening the drawing tool. A small bubble level on the stand can provide the same physical check.
Then test the setup with geometry rather than detail. Place four dots at the subject limits and one dot at a central landmark. Move your drawing hand away and look again. If all five points still match, the setup is probably stable enough. If only one side has shifted, check phone tilt. If every point shifted together, the paper or mount probably moved.
A Better Practice Workflow: Align, Map, Hide, Redraw
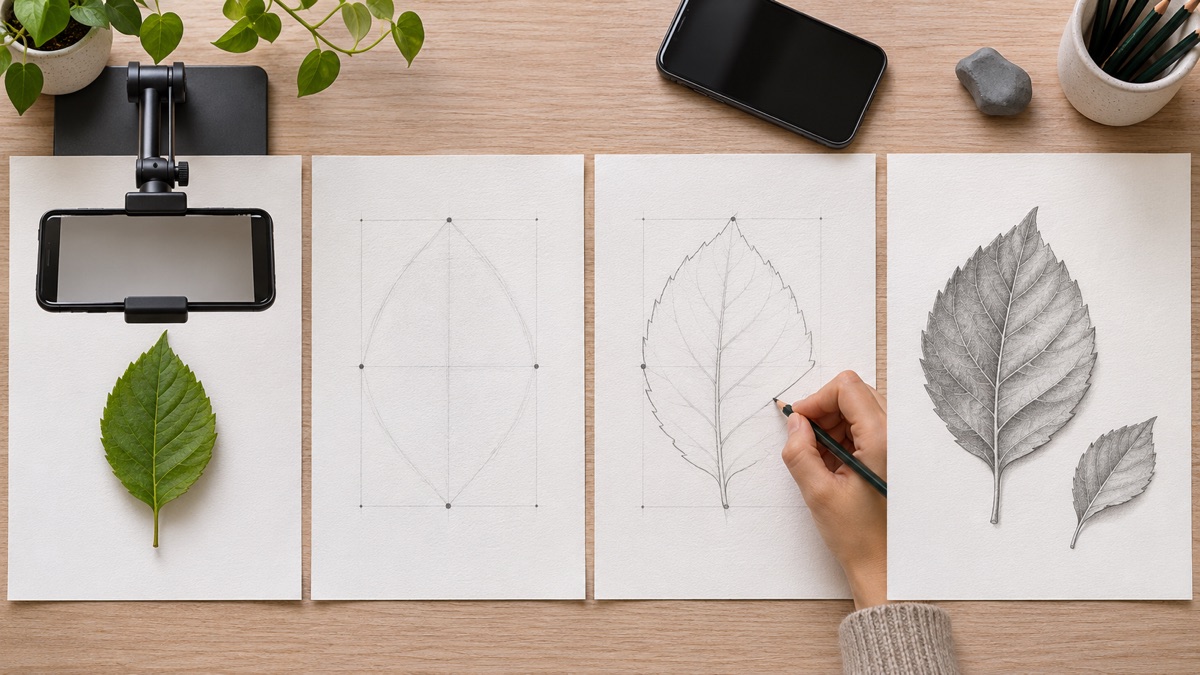
The strongest camera lucida practice changes the task before the drawing is finished. The phone helps with the first decisions, then observation and memory take over. Use this four-part sequence:
- Align: fit the subject to the page and confirm the outer limits.
- Map: draw a light bounding shape, centerline, and three to six landmarks.
- Hide: remove the overlay and connect the structure while looking at the original reference.
- Redraw: make a smaller second version on blank paper without the overlay. Change the angle, size, or one feature so it is not an exact repeat.
A controlled study of adults learning unfamiliar patterns found that tracing improved immediate shape and size accuracy, but after one week tracing and copying did not differ in redraw accuracy. That does not mean tracing is useless. It means clean performance while the guide is present is not the same thing as transferable skill. A separate trace drawing learning guide explains how to move from guidance to recall and variation.
Keep the assisted portion short. If a 20-minute sketch spends 15 minutes under the overlay, reduce the next session to five guided minutes and 15 freehand minutes. The goal is not to prove that you can follow every pixel. It is to notice proportions quickly enough that you can make confident decisions after the overlay disappears.
Best Subjects for Phone-Assisted Drawing
| Subject | Use the overlay for | Finish freehand with |
|---|---|---|
| Botanical studies | Stem direction, leaf spacing, outer contour | Veins, edge variation, shadows |
| Portraits | Head shape, eye line, feature placement | Expression, hair groups, values |
| Animals | Body masses, joint locations, pose angle | Fur, markings, gesture |
| Lettering | Baseline, cap height, overall spacing | Stroke rhythm, weight, flourishes |
| Buildings and objects | Major corners, perspective direction, proportions | Materials, texture, selective detail |
Busy photographs are harder because the camera treats texture, color changes, reflections, and cast shadows as equally visible. Simplify first. The photo-to-sketch workflow can turn a complex photo into a clearer reference, while the detailed photo-to-sketch app guide shows how to keep the original photo involved so the conversion does not dictate every line.
Common Problems and Practical Fixes
The drawing stretches toward one corner
The phone is probably not parallel to the paper. Level the mount, center the camera over the page, and repeat the five-point calibration. Do not try to correct a setup error by bending each traced line in the opposite direction.
The overlay moves when your hand touches the screen
Tighten every joint in the stand and make all scale or opacity adjustments before drawing. Use a gentle touch. If the mount continues to wobble, replace it with a rigid stand rather than accepting constant drift.
Your hand blocks the area you need to see
Raise the phone slightly, reduce the reference size, and work from the side opposite your drawing hand. Right-handed artists can start on the left side of the paper; left-handed artists can start on the right. Keep the largest landmarks visible even when the pencil tip is hidden.
The lines look accurate but lifeless
Stop tracing sooner. Hide the reference after the scaffold, then redraw long curves with one confident movement. Vary pressure, simplify repeated details, and make some edges softer than others. Accuracy gives you structure; selection gives the drawing character.
The screen is too bright or the page is hard to read
Use even room light, reduce glare, and adjust overlay opacity before changing screen brightness dramatically. Take short visual breaks. A well-lit page and medium-opacity guide are easier to compare than a bright screen over a dark workspace.
Reference Images, Copyright, and Privacy
The simplest references are your own photographs, images supplied inside the app for that purpose, public-domain works, or images whose license allows your planned use. The U.S. Copyright Office notes that photographs are protected creative works and advises getting permission before using someone else’s online photo. Changing or tracing an image does not automatically make the underlying rights disappear.
Personal practice that stays in a sketchbook is different from selling, publishing, or using a traced image in a logo. If you plan to share or commercialize the result, verify the source and license, ask permission when needed, and add substantial original choices rather than copying an entire composition. This is general creative-practice guidance, not legal advice.
Also check what is visible to the camera. Remove private documents, addresses, family photographs, or screens from the drawing area. Review camera permissions in your phone settings, and use references you are comfortable opening on the device.
Final Checklist for a Useful Session
- The phone is secure, charged, and parallel to the paper.
- The paper is taped or marked so movement is obvious.
- The reference has one clear subject and a readable silhouette.
- Four outer anchors and one central landmark still align.
- Construction lines are light enough to erase or draw over.
- The overlay is hidden before texture, values, and final line weight.
- A short freehand redraw follows the guided version.
A camera lucida app is most valuable when it shortens the distance between “I cannot place this” and “I can now study this.” Use it to solve one structural problem, then let your eyes and hand finish the work. For a broader routine after setup, follow the step-by-step drawing practice guide or compare physical and phone tools in Drawing Projector App vs Lightbox.
Use How to Draw for a light guided scaffold, then hide the overlay and finish with observation, memory, and your own choices.
Related Drawing Guides
- AR Drawing App: Trace Pictures on Paper With Your Phone
- Trace Drawing App: When Tracing Helps You Learn
- Drawing Projector App vs Lightbox
- Photo to Sketch App Guide
- AR Drawing Phone Setup Guide
- AR Drawing App Overview
- Photo to Sketch Drawing Guide
- Step-by-Step Beginner Practice Guide
References
- Smithsonian Institution: Camera Lucida
- Getty Research Institute: A Guide to Rare Photographs and Optical Devices
- Apple Support: Use iPhone Camera Tools to Set Up Your Shot
- Experimental Brain Research: Is Tracing or Copying Better When Learning to Reproduce a Pattern?
- U.S. Copyright Office: What Photographers Should Know About Copyright